How to Assemble the Bicystar LS-G2113BN Pet Stroller
Use this model-specific guide to assemble — or disassemble — the Bicystar LS-G2113BN lightweight 3-in-1 pet stroller. Follow each step in order, check every click, and use the PDF manual or support email if you need help.
Quick Summary
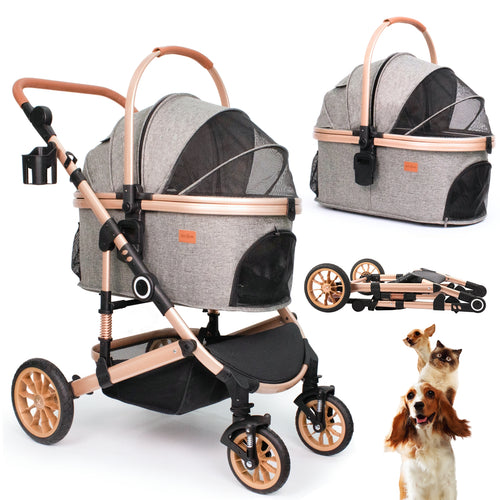
The Bicystar LS-G2113BN is a lightweight 3-in-1 pet stroller with a maximum weight limit of 33 lbs. It is designed for travel-friendly use with one medium pet or small pets, and features a one-hand fold for easy transport.
Assembly starts with unfolding the frame, then installing all four wheels, setting up the pet carrier's internal steel frame, adding the comfort pad, locking the carrier onto the stroller frame, and finally attaching the handlebar organizer. Most users complete setup in under 15 minutes.
This guide also includes a disassembly walkthrough if you need to repack the stroller for return or storage. If a part does not fit, stop and check the alignment before applying force. The PDF manual and support email are available at the bottom of this page.
Product Snapshot
- Model LS-G2113BN
- Category Pet Stroller
- Type Lightweight 3-in-1
- Max Weight 33 lbs
- Fold Style One-hand fold
- Best For Travel-friendly use, one medium pet or small pets
- Included Parts Stroller frame, carrier, wheels, stroller organizer
- Warranty 5-year frame, 3-year tires, 2-year components
Assembly & Disassembly Videos
Watch the relevant video before you begin. The assembly video covers the full setup. The disassembly video shows how to safely repack the stroller for return or storage.
Setting up your LS-G2113BN
Repacking for return or storage
Parts List
Check all parts before you start. Every item below should be in the box.
| Part | Description | Qty |
|---|---|---|
| A | Stroller frame | 1 |
| B | Pet carrier | 1 |
| C | Pet carrier pad | 1 |
| D | Front wheels | 2 |
| E | Rear wheels | 2 |
| F | Stroller organizer | 1 |
| G | User manual | 1 |
Missing a part? Stop the assembly and contact support with your model number, shipping address, and a photo or video of the issue before continuing.
Assembly Steps
Follow these 6 steps in order. Each step matches the assembly video and the model-specific PDF manual.
Unfold the Frame
- Pull the stroller frame open until it is fully spread out.
- Continue opening until the frame locks into place on its own.
- Give the frame a gentle shake to confirm it is secure before moving on.
Attach the Wheels
Push each wheel firmly into its socket until you hear a clear click. The click confirms the wheel is safely locked in place.
- Insert all four wheels onto the frame one at a time.
- Push each wheel firmly into its socket until you hear a click.
- Check all four wheels are secure before moving to the next step.
Assemble the Pet Carrier
- Locate the steel support frame inside the pet carrier.
- Stretch the steel frame outward toward both ends of the carrier.
- Press the steel frame down into the designated slots at the base of the carrier until it snaps into place.
Insert the Comfort Pad
- Take the included comfort pad.
- Place it flat at the bottom of the carrier.
- Press it into place so it sits flush and does not shift.
Install the Pet Carrier on the Stroller Frame
This step has a specific sequence. The rear hooks must engage the frame first before you lower the front end. Do not force the carrier down.
- Tilt the rear end of the pet carrier slightly lower than the front.
- Slide the carrier forward onto the stroller frame.
- Make sure the rear hooks under the carrier connect with the stroller frame.
- Lower the front end of the carrier until the front hook clicks into the frame.
Attach the Handlebar Organizer
- Place the organizer onto the handlebar of the stroller frame.
- Wrap the velcro straps around the handlebar.
- Pull the straps tight and press them firmly to secure the organizer.
Disassembly Steps
Use these steps if you need to repack the LS-G2113BN for a return, travel, or storage. Follow the disassembly video above alongside these steps.
Before you start: Remove your pet and any belongings from the carrier. Make sure the stroller is on a flat, stable surface before disassembling.
Remove the Handlebar Organizer
- Unfasten the velcro straps from the handlebar.
- Slide the organizer off the handlebar and set it aside.
Detach the Pet Carrier from the Frame
This is the reverse of Step 5 in assembly. Release the front hook first, then lift the rear end to unhook it from the frame.
- Release the front hook by lifting the front end of the carrier.
- Tilt the front of the carrier upward to disengage it from the frame.
- Slide the carrier backward and lift the rear hooks clear of the frame.
- Set the carrier aside on a flat surface.
Remove the Comfort Pad
- Lift the comfort pad out of the bottom of the carrier.
- Fold or roll it flat for packing.
Collapse the Pet Carrier Frame
- Press the steel support frame inward to release it from the base slots.
- Compress the steel frame toward the center of the carrier.
- Fold the carrier flat for storage or repacking.
Remove the Wheels
- Press the release button on each wheel socket.
- Pull the wheel outward while holding the release button.
- Repeat for all four wheels.
Fold and Repack the Frame
- Fold the stroller frame using the one-hand fold mechanism.
- Collapse it fully until it sits flat and compact.
- Place the frame, wheels, carrier, pad, and organizer back into the original packaging in the order they were packed.
Returning this item? Once repacked, contact support at anita@bicystar.com with your order details and model number to start the return process.
PDF User Manual
Download the full LS-G2113BN PDF manual for part diagrams, model-specific setup details, safety guidelines, and official reference steps.
FAQ
How do I know the LS-G2113BN frame is fully unfolded?
How do I know the wheels are installed correctly?
What should I do if the pet carrier feels loose on the frame?
What is the maximum weight the LS-G2113BN can hold?
How do I disassemble the stroller for a return?
Where can I download the full user manual?
What should I do if a part is missing or damaged?
Support
If you need help with the LS-G2113BN — whether assembling, troubleshooting, or starting a return — contact Bicystar support at anita@bicystar.com.
Please include your model number, shipping address, and photos or video of the issue so support can review it quickly.
Trust / Warranty Note
The LS-G2113BN pet stroller includes 5-year frame coverage, 3-year tire coverage, and 2-year component coverage. Warranty support is model-specific. For warranty claims, contact anita@bicystar.com with your model number and proof of purchase.