Use this model-specific guide to assemble the Bicystar HLD-X6DD pet stroller in a clear, step-by-step order. Follow the clicks, check each part as you go, and use the PDF manual or support email if you need help.
Quick Summary
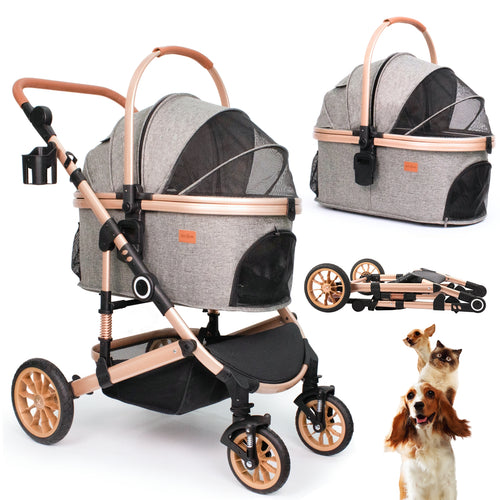
The Bicystar HLD-X6DD is a 3-in-1 detachable pet stroller with a maximum weight limit of 50 lbs. It is designed for 1 medium dog or 2 small pets.
Assembly starts with unfolding the frame, then installing the front and rear wheels, setting up the pet carrier, adding the lining and pad, and locking the carrier into the frame.
If a part does not fit, stop and check the alignment before you force anything. You can also use the PDF manual or contact support for model-specific help.
Product Snapshot
- Model HLD-X6DD
- Category pet stroller
- Max Weight 50 lbs
- Best For 1 medium dog or 2 small pets
- Included Parts Frame, carrier, lining, pad, wheels, connectors, cup holder
- Warranty 5-year frame, 3-year tires, 2-year components
Assembly Video
Watch the assembly video below for a visual walkthrough of the HLD-X6DD setup.
Parts List
| Part | Description | Qty |
|---|---|---|
| A | Stroller frame | 1 |
| B | Pet carrier | 1 |
| C | Pet carrier lining | 1 |
| D | Pet carrier pad | 1 |
| E | Front wheels | 2 |
| F | Rear wheels | 2 |
| G | Carrier connectors | 2 |
| H | Cup holder | 1 |
Missing a part? Stop the assembly and contact support with your model number, shipping address, and a photo or video of the issue.
Main Assembly Steps
Follow these 7 steps in order. Each step matches the assembly video and the model-specific PDF manual.
Frame Unfolding
- Start by extending the stroller frame.
- Pull it apart until it is fully spread out and ready for assembly.
- Engage the lock on the right side of the handle to secure the frame.
Front Wheels Installation
- Find the spaces on the frame made for the front wheels.
- Insert each front wheel firmly into its slot.
- Make sure both wheels are secure and do not wobble.
Rear Wheels Installation
Press the side button and insert the rear wheel at the same time. Keep pushing until you hear a click.
- Place the rear wheel at its slot.
- Simultaneously press the side button and insert the wheel.
- Push until you hear a click.
- Repeat for the second rear wheel.
Set Up the Pet Carrier Frame
- Grasp the steel support frame inside the pet carrier.
- Stretch the support to both ends of the carrier.
- Snap the small curves on the frame into the prepared holes at the carrier base.
Attach the Lining
- Set the inner lining inside the pet carrier.
- Thread the 2 attached leashes through the matching holes on either side of the carrier bottom.
- Zip the lining and the carrier together.
Install the Pad
- Insert the comfort pad into the carrier.
- Use the provided Velcro to keep the pad from slipping.
Final Assembly
- Insert the two connectors onto each side of the carrier until you hear a click.
- Place the carrier into the stroller frame.
- Push down until it clicks into place.
PDF User Manual
Download the full HLD-X6DD PDF manual for diagrams, model-specific setup details, and official reference steps.
FAQ
How do I know the HLD-X6DD frame is fully unfolded?
How do I know the wheels are installed correctly?
What should I do if the carrier does not click into the frame?
What is the maximum weight for the HLD-X6DD?
Where can I download the full manual?
What should I do if parts are missing?
Support
If you need help with the HLD-X6DD, contact Bicystar support at anita@bicystar.com.
Please include your model number, shipping address, and photos or video of the issue so support can review it quickly.
Trust / Warranty Note
The HLD-X6DD pet stroller includes 5-year frame coverage, 3-year tire coverage, and 2-year component coverage. Warranty support is model-specific.